Nanite Cluster Memory
Opening Notes
As mentioned in the earlier post, our game world is covered in dense fir forest, thousands of trees with detailed canopies sitting over thick moss-covered ground. All meshes use Unreal’s Nanite rendering with a really high detail level.
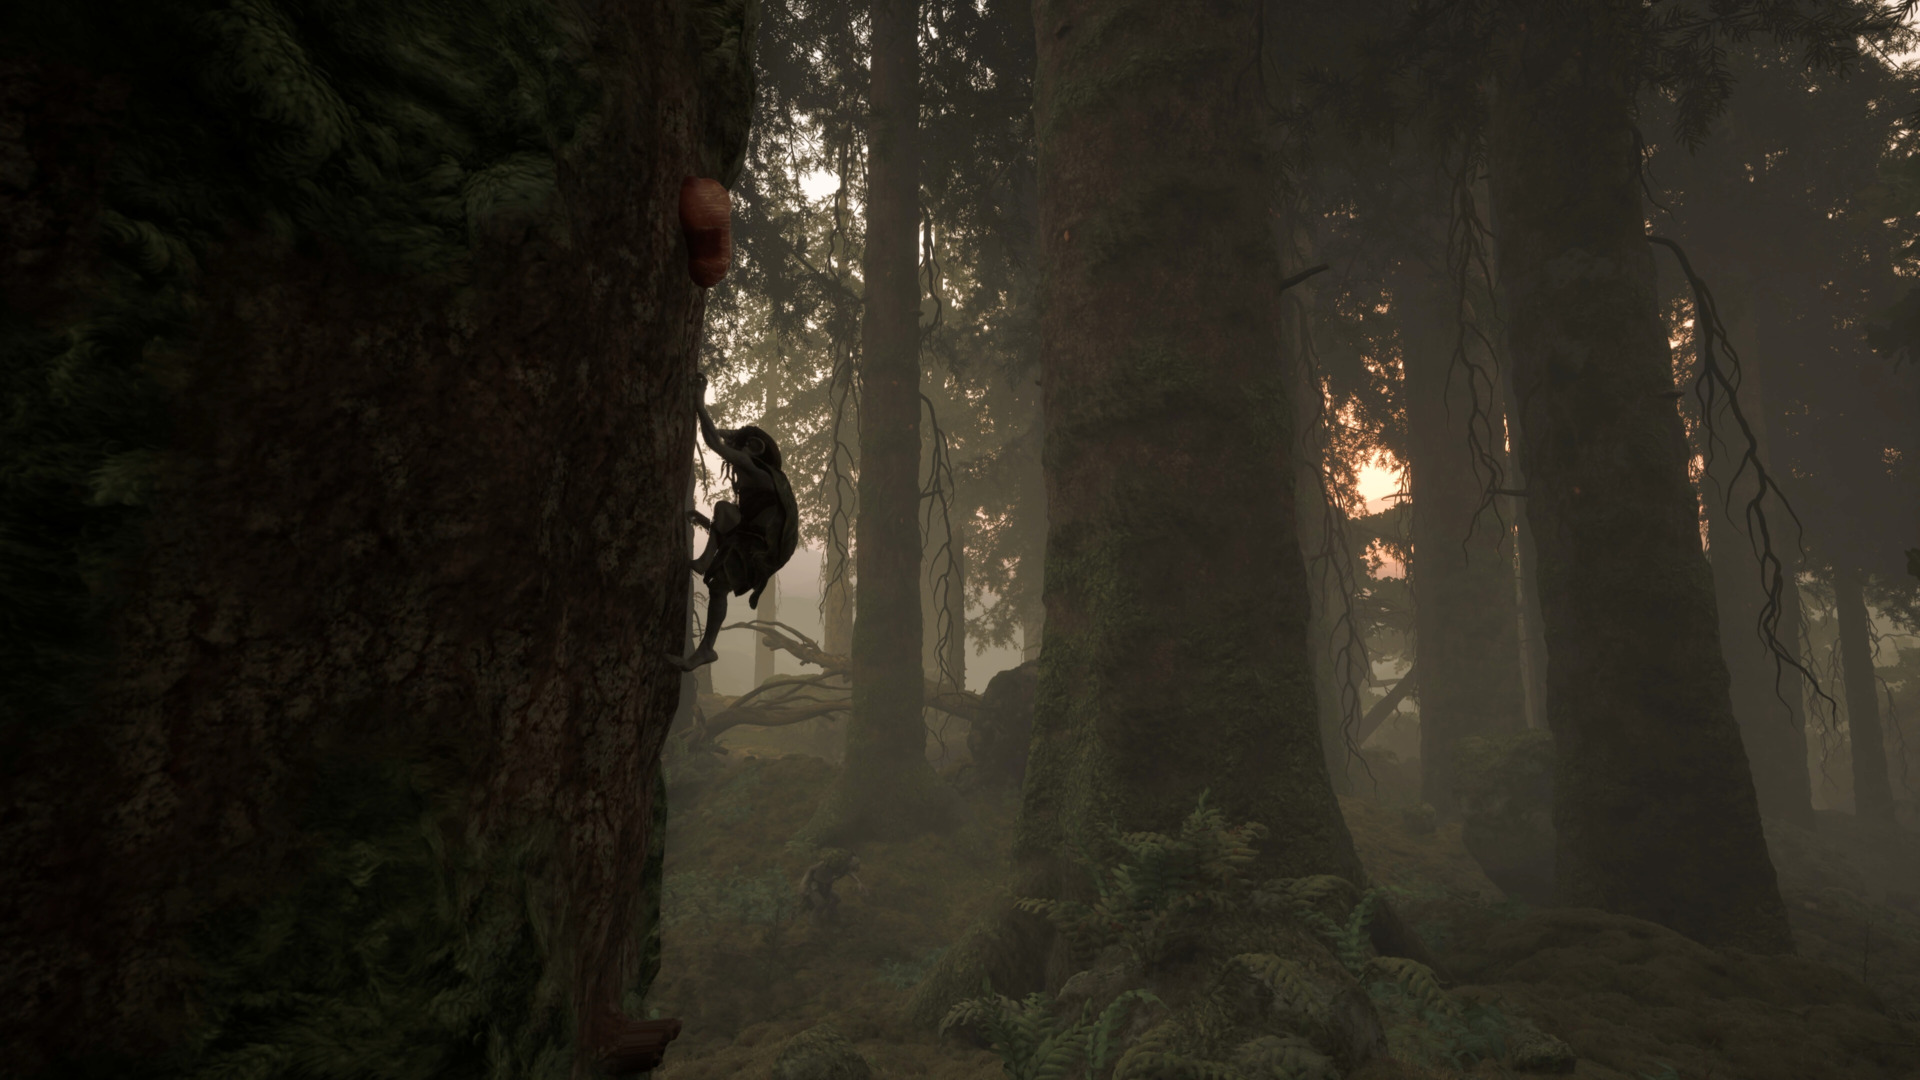
Screenshot from our title Trollheim: Gnomes.
But this also creates a problem. The sheer amount of Nanite clusters (meshlets) generated by all foliage pushes the Nanite visible buffer over its limit. And in the end this results in a very unhappy GPU and editor warnings.

Screenshot with the warning message: “Nanite visible cluster buffer overflow detected.”
This post covers how we got the Nanite visible buffer cost under control. More specifically:
- How we tracked down the major contributors to the cluster count and reduced it by 70%.
- Why we decided to switch off Nanite rendering on specific meshes to reduce overdraw.
- How we tweaked rendering distance on Nanite tessellation for performance.
- How UE 5.7 further helped get the buffer stat down.
But first let’s have a short explanation of what Nanite cluster buffer overflow is.
Nanite Rendering And Buffer Overflow
Nanite renders meshes by breaking them into clusters of triangles and streaming only the clusters that are visible and at the appropriate detail level for a given frame. When the number of visible clusters exceeds what that buffer can hold, you get the overflow warning. In a dense forest scene with this much aggregate geometry, it is easy to blow past that budget without realizing it. And when you have, you probably have a GPU that’s very busy with the Nanite visible cluster buffer pass, mostly due to a lot of overdraw. It could spike to over +15ms.
The reason we ended up with the buffer overflow in the first place was due to Nanite LOD oversimplification and us trying to prevent it.
Preventing Oversimplification
When you work with Nanite trees you soon discover that the canopy gets reduced to nothing rather quickly the further it gets from the camera. This is because of how Nanite’s cluster hierarchy works. At import, Nanite builds a hierarchy of progressively coarser cluster levels based on the original mesh triangles. To create good clusters it needs triangles with connected neighbors. The further the camera is from the mesh, the coarser the cluster level that gets selected. With fir needles, each needle is a tiny disjoint piece of geometry with no topological connection to its neighbors. Nanite’s simplification has nothing to merge them into, so they simply get dropped.
There is a setting meant to help with exactly this, called Preserve Area, which tries to maintain the silhouette and surface coverage of the mesh as it simplifies. It does this by redistributing the lost area to the remaining triangles, essentially dilating the open boundary edges outward. But that setting doesn’t really cut it in most cases when working with very detailed and dense meshes like fir trees. In fact, it usually creates ugly artifacts, since it doesn’t know how to expand the fir needle canopy geometry in a good way.

Image from Iri Shinsoj’s Nanite Foliage blogpost. Showing the difference between a Nanite tree using the Preserve Area setting compared to one that has it disabled.
So the next step for us was to edit the Maximum Edge Length setting on these assets. This setting defines the maximum screen-space pixel distance between vertices in the simplified mesh, which effectively puts a cap on how large the triangles can get in the distance. By keeping edges shorter, Nanite is forced to maintain more triangles in the distant cluster hierarchy, preserving the silhouette of the canopy. The setting comes with a warning: “The default is 0 and should be kept there unless you have issues caused by over-simplification.” Pushing it lower produces more clusters, as we will find out.
Aggregate Geometry And Overdraw
After some tests it became apparent that the ground moss and fir tree canopy needles were the major culprits for the majority of the clusters. Those were some of the assets that we had tuned with the Max Edge Length setting. In other words, the fix we had applied to prevent oversimplification was now the direct cause of the buffer overflow.
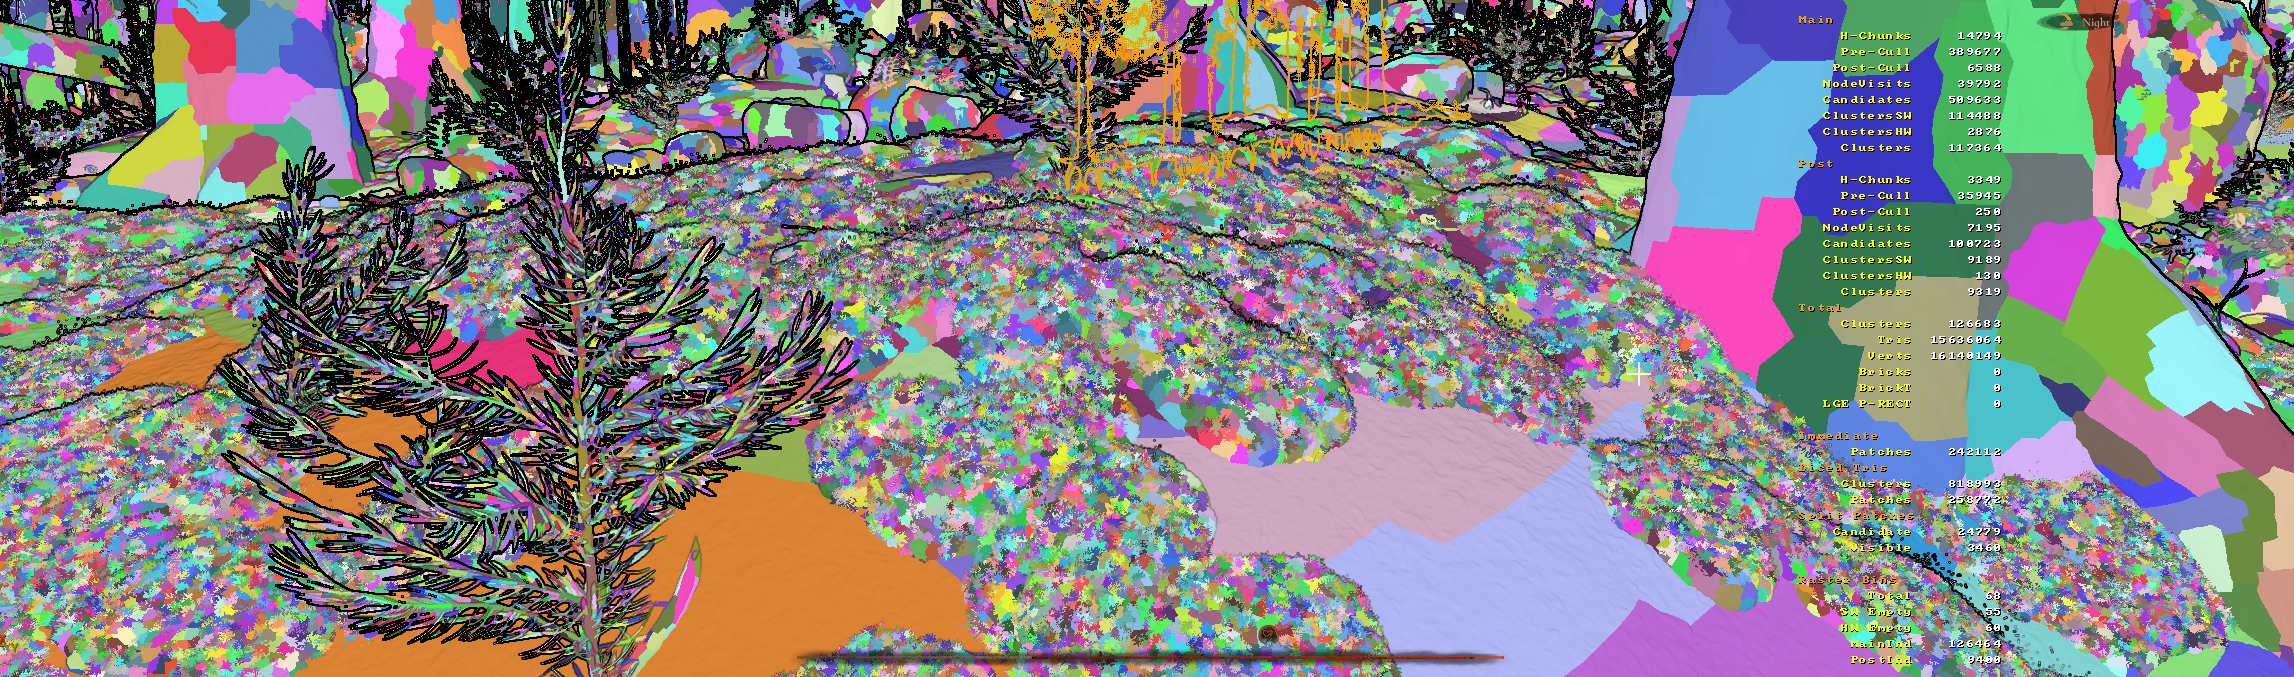
A debug visualization showing the meshlets of our moss models covering the terrain.
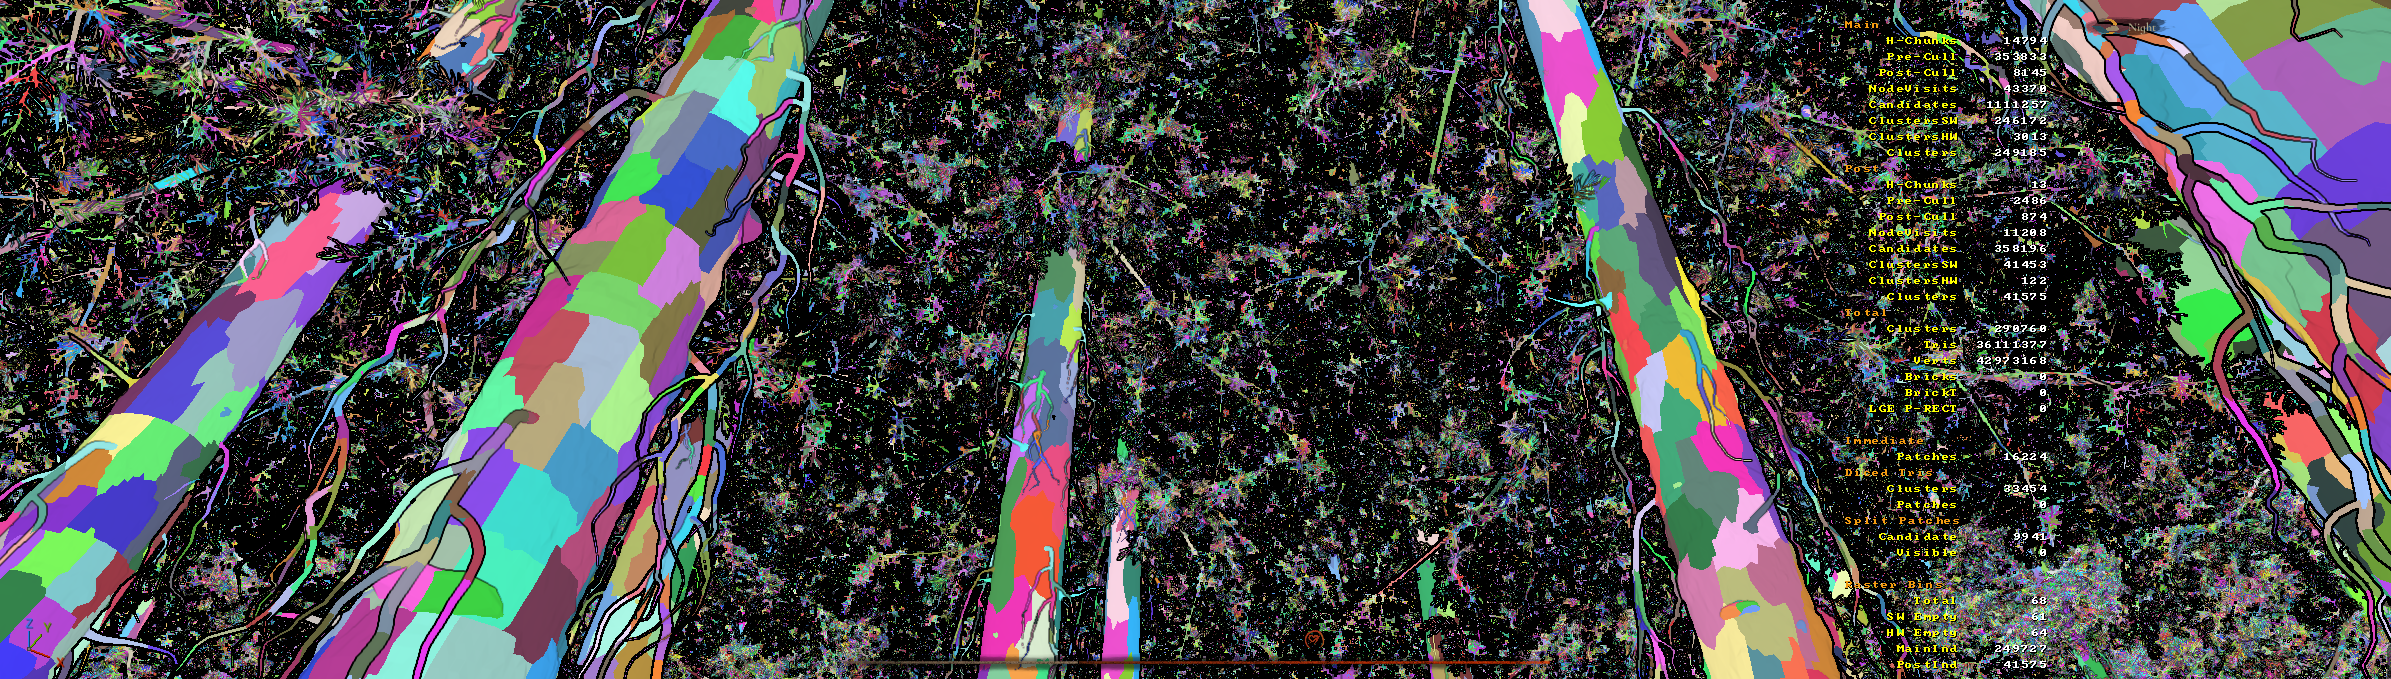
A debug visualization showing the meshlets of our fir tree canopy.
As you can see, the amount of visible clusters is very high. Both the moss and the canopy are classic examples of aggregate geometry with disjoint pieces. This means a large number of clusters get submitted to the Nanite visible buffer, pushing it toward its limit and creating a lot of unnecessary GPU work.
Unsurprisingly, the moss and fir tree canopies were also the biggest overdraw offenders.
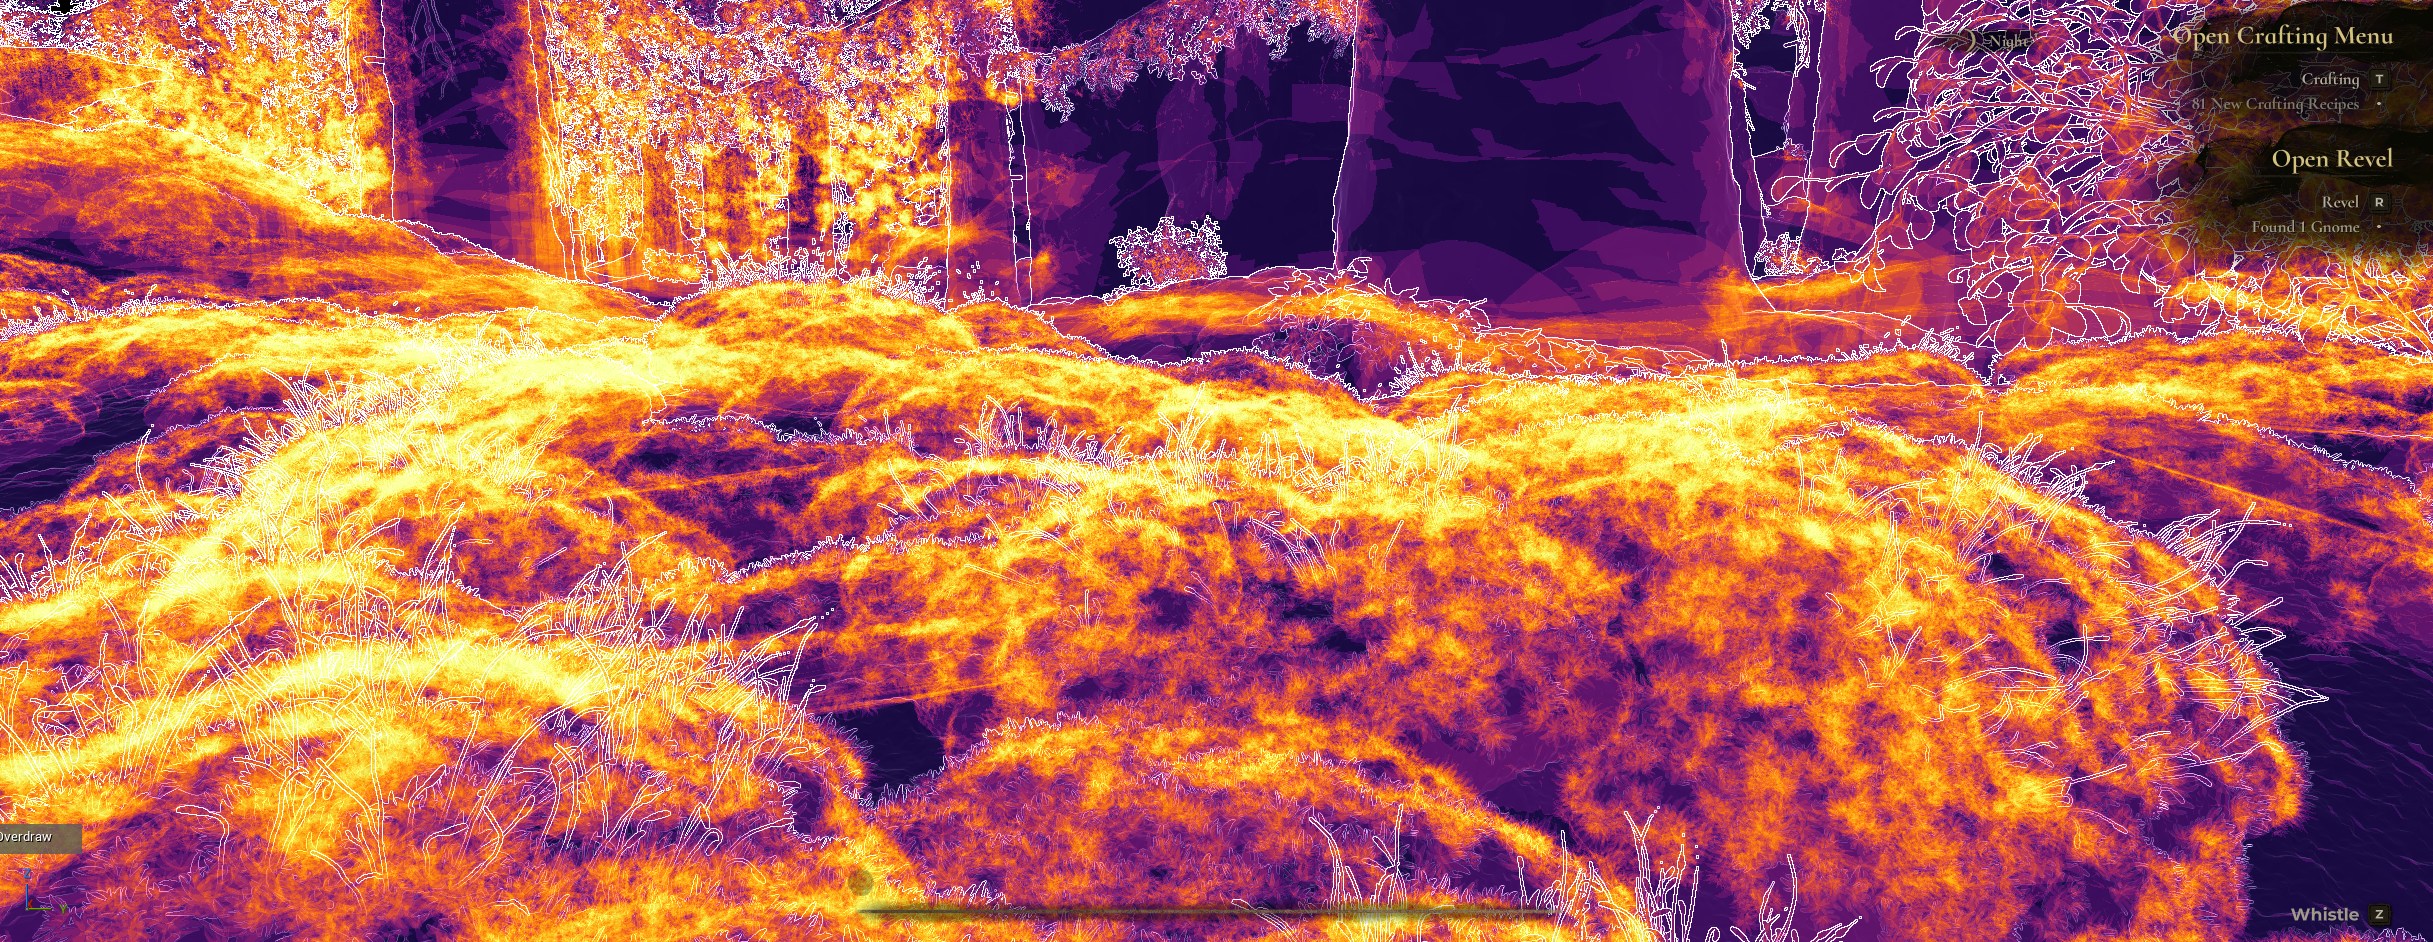 A debug visualization showing the overdraw of our moss models covering the terrain.
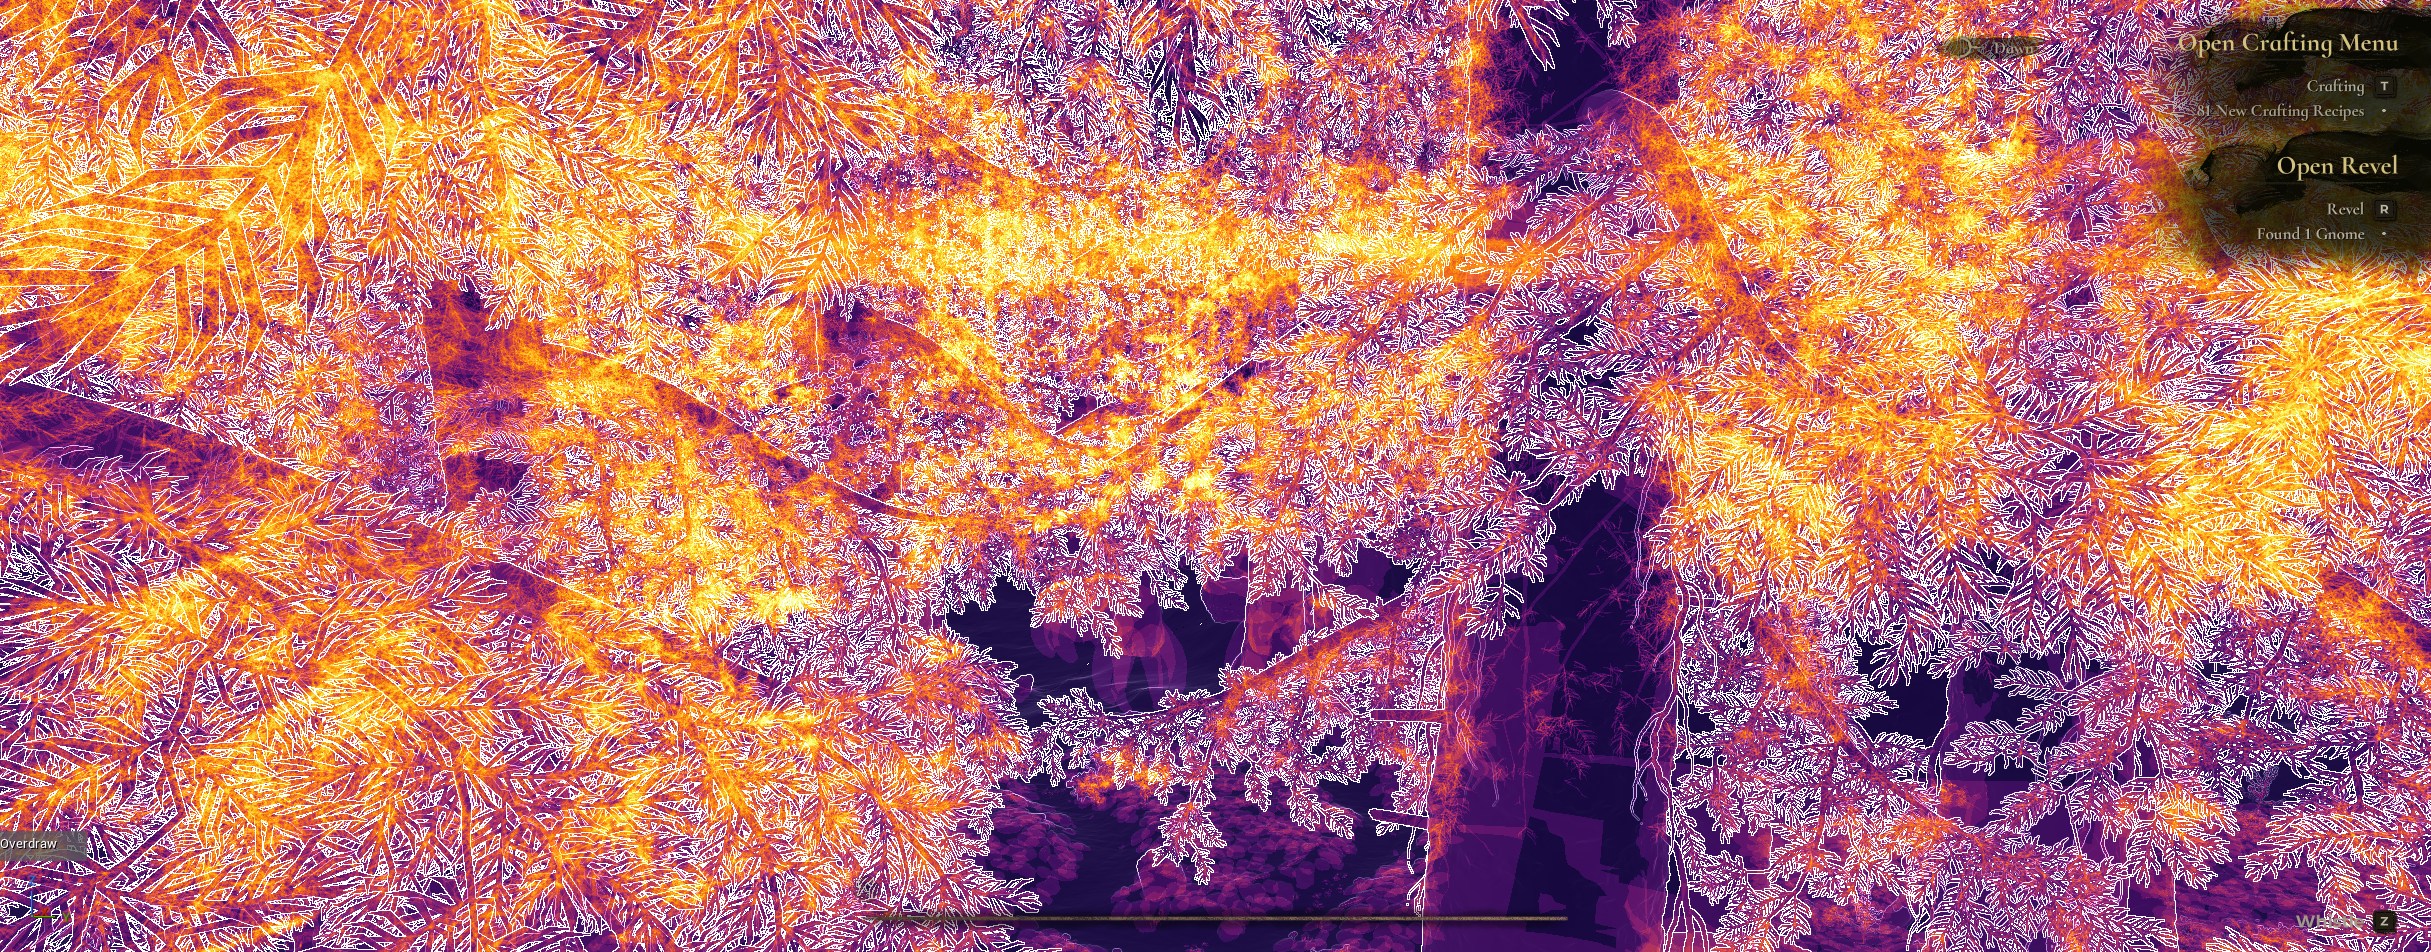 A debug visualization showing the overdraw of our fir tree canopy.
So how can we solve this without losing all the canopy and moss detail?
Original Mesh Optimization
The triangle density of the original mesh has a direct effect on how dense the clusters on the Nanite mesh will be.
There are two ways to bring that density down: optimize the original mesh, or simply lower the “Keep Triangle Percent” build setting to something you’re comfortable with. Optimizing the mesh manually is obviously the better option, since it gives you full control over where the triangle budget goes, keeping detail where it matters for the silhouette and cutting it everywhere else, rather than having the engine do it for you.
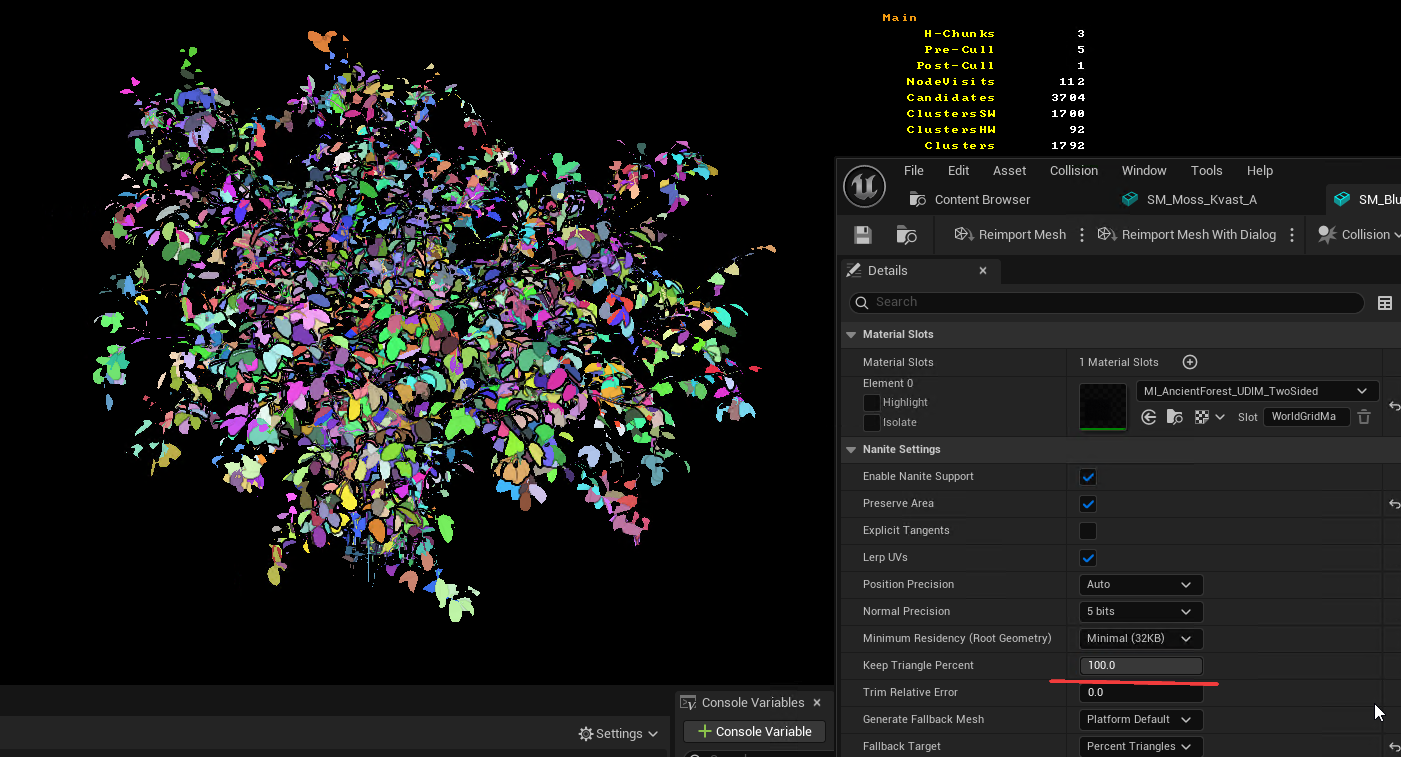
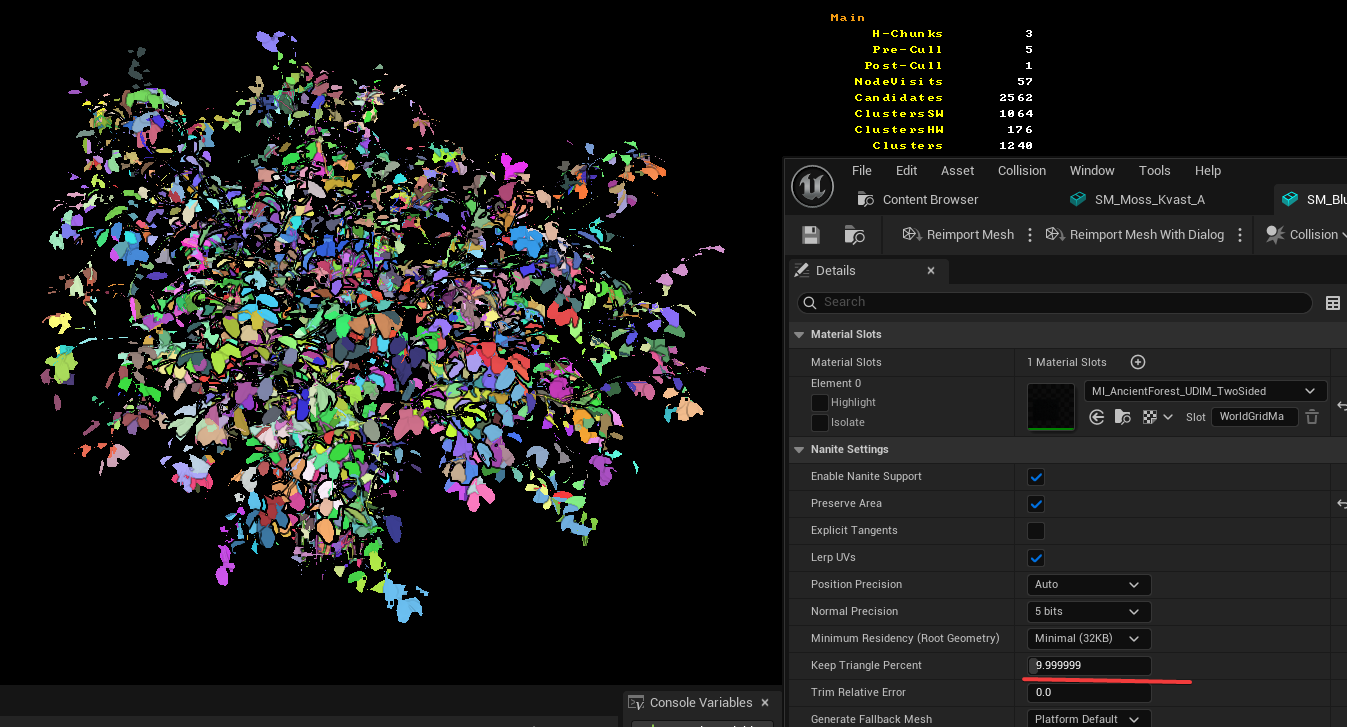
A bush’s cluster amount, before and after reducing the amount of triangles.
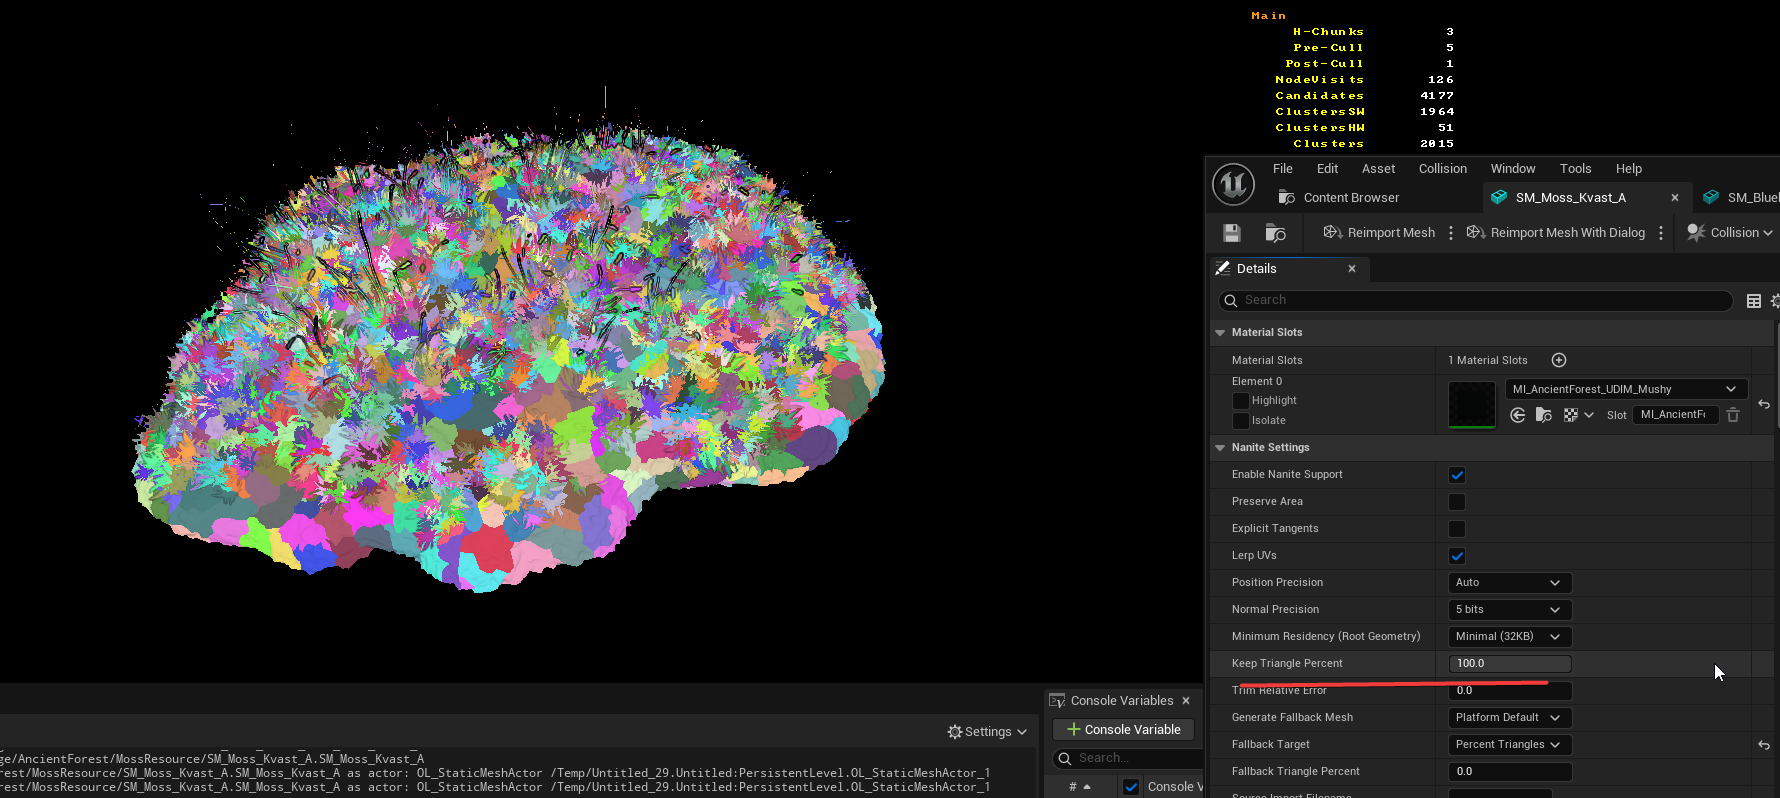
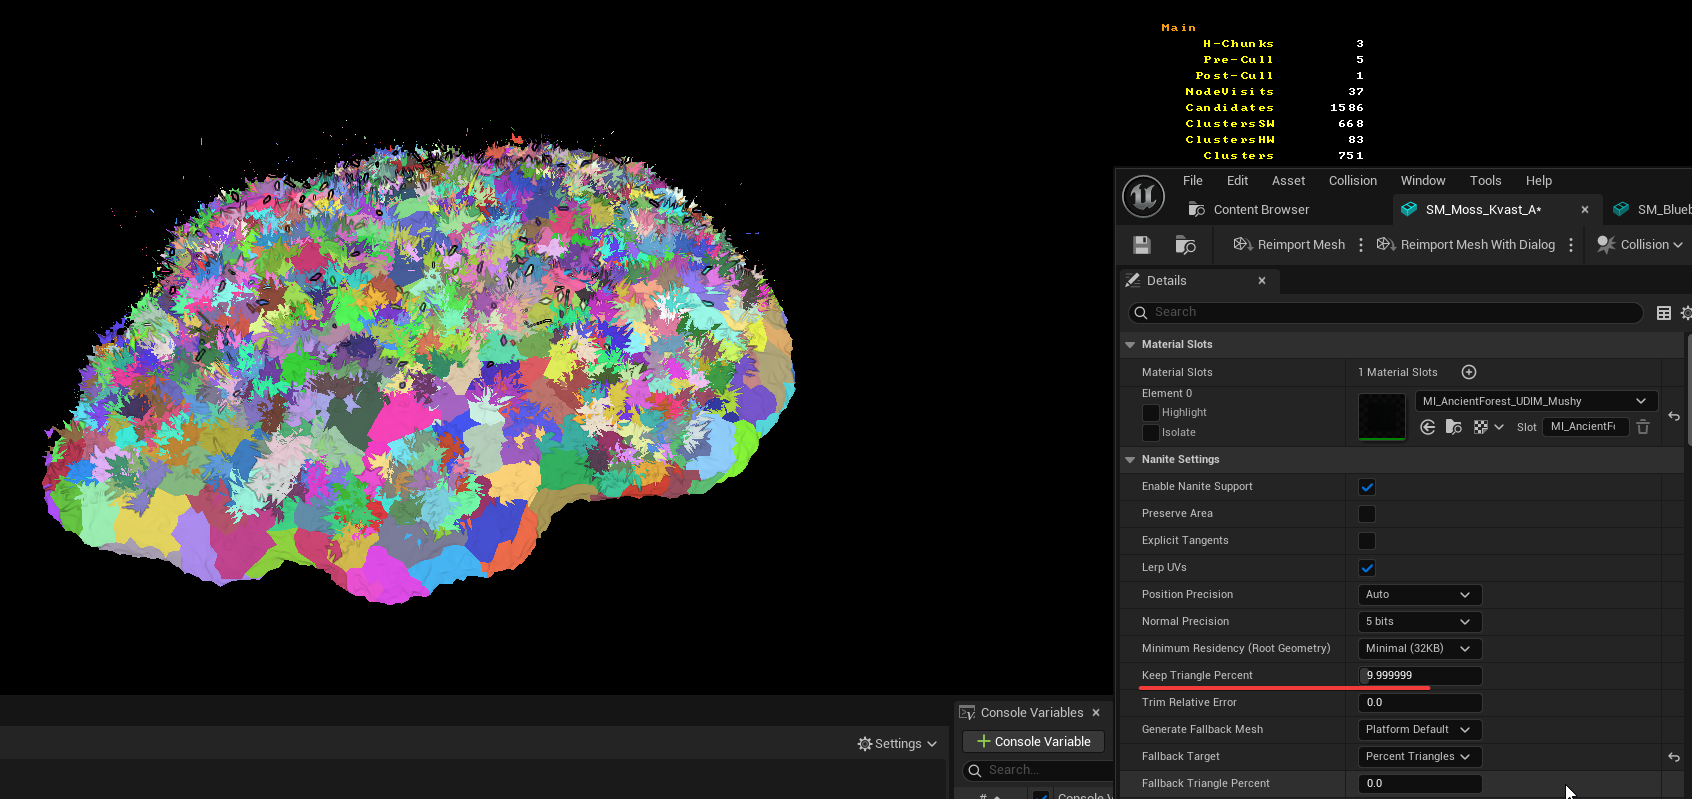
A moss patch’s cluster amount, before and after reducing the amount of triangles.
As you can see above, reducing the mesh’s tri count brings the Nanite cluster count down right along with it.
Maximum Edge Length
As mentioned earlier, we used a custom Max Edge Length value to stop the trees from becoming oversimplified. But now we know that the drawback of this is that it greatly affects how many clusters we render in the distance. A smaller value forces Nanite to maintain shorter edges in the cluster hierarchy, generating more clusters. Increasing it allows Nanite to simplify more aggressively.
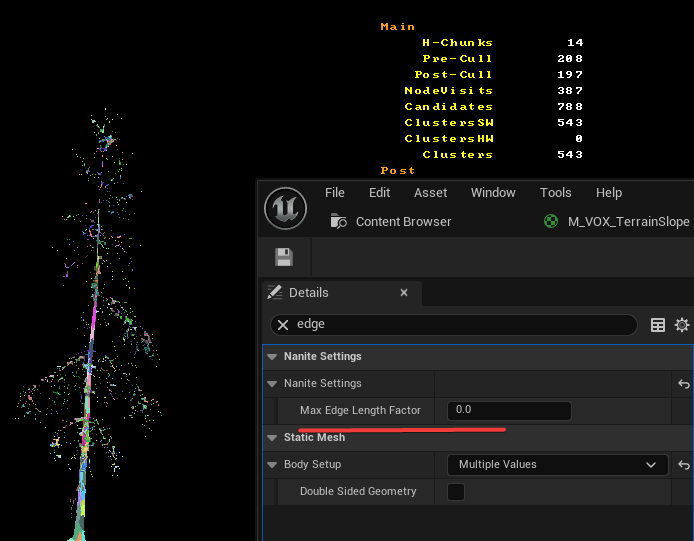
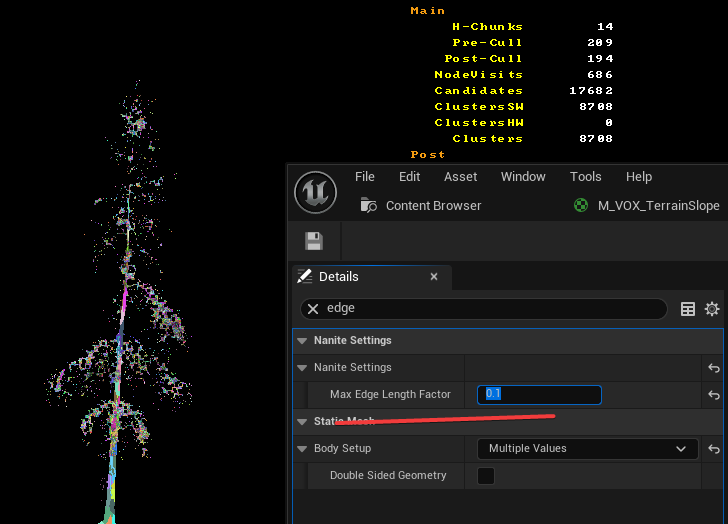
Images showing the major difference in cluster amount created on a fir tree when using the custom 0.1 value compared to 0 (default).
By changing the Max Edge Length from the custom 0.1 to 0 (the default) on fir tree branches, I reduced clusters from ~8700 to ~540 on a single asset. This translates to a reduction of over 100k clusters in one of our dense forest scenes. It became very clear that keeping the silhouette details came with a large cost.
In the end we landed on using 0.2 - 0.4 on some of our fir tree assets that still looked oversimplified in the distance. This setting increases cluster count, but we felt it was necessary to maintain acceptable canopy silhouette detail at range.
Material Quality Settings And Runtime Displacement
We use runtime displacement on different material surfaces depending on what quality level you run.
It’s important to know that when you displace a material, Nanite tessellates it dynamically to pixel-level precision. This greatly affects the cluster amount.
On Low, we only displace the terrain. On Medium, the terrain and moss surfaces are displaced. On High, the terrain, moss, and rock are displaced. This is why the cluster count differs so dramatically between quality settings.
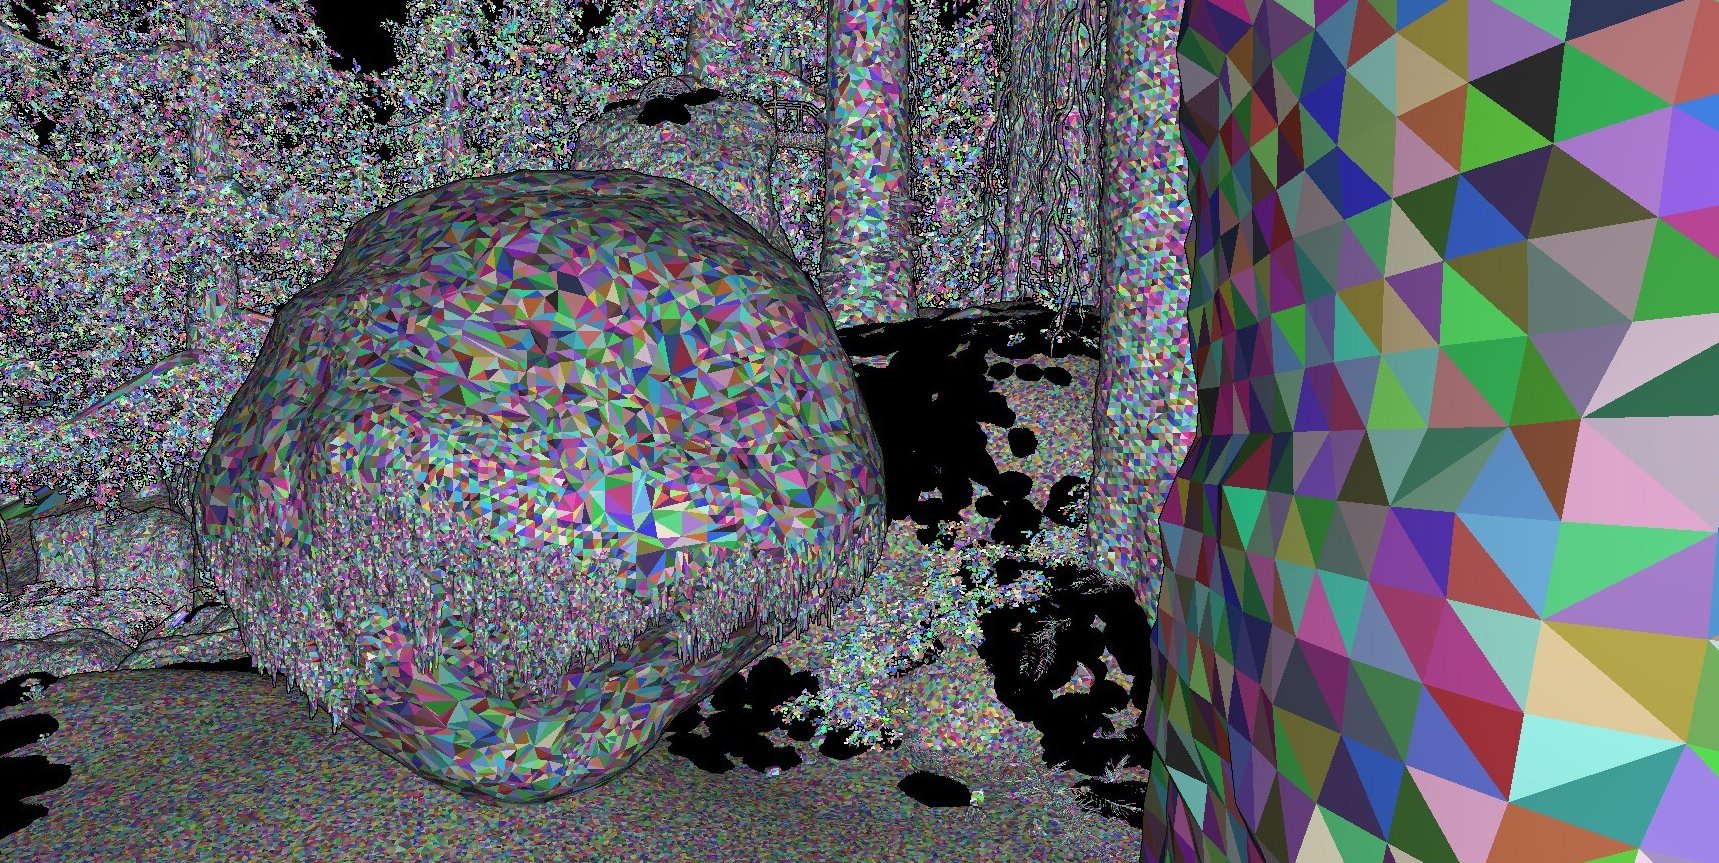
On Low Material Quality Setting, Nanite Displacement is disabled.
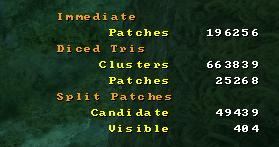
Cluster amount with Low Material Quality Setting.
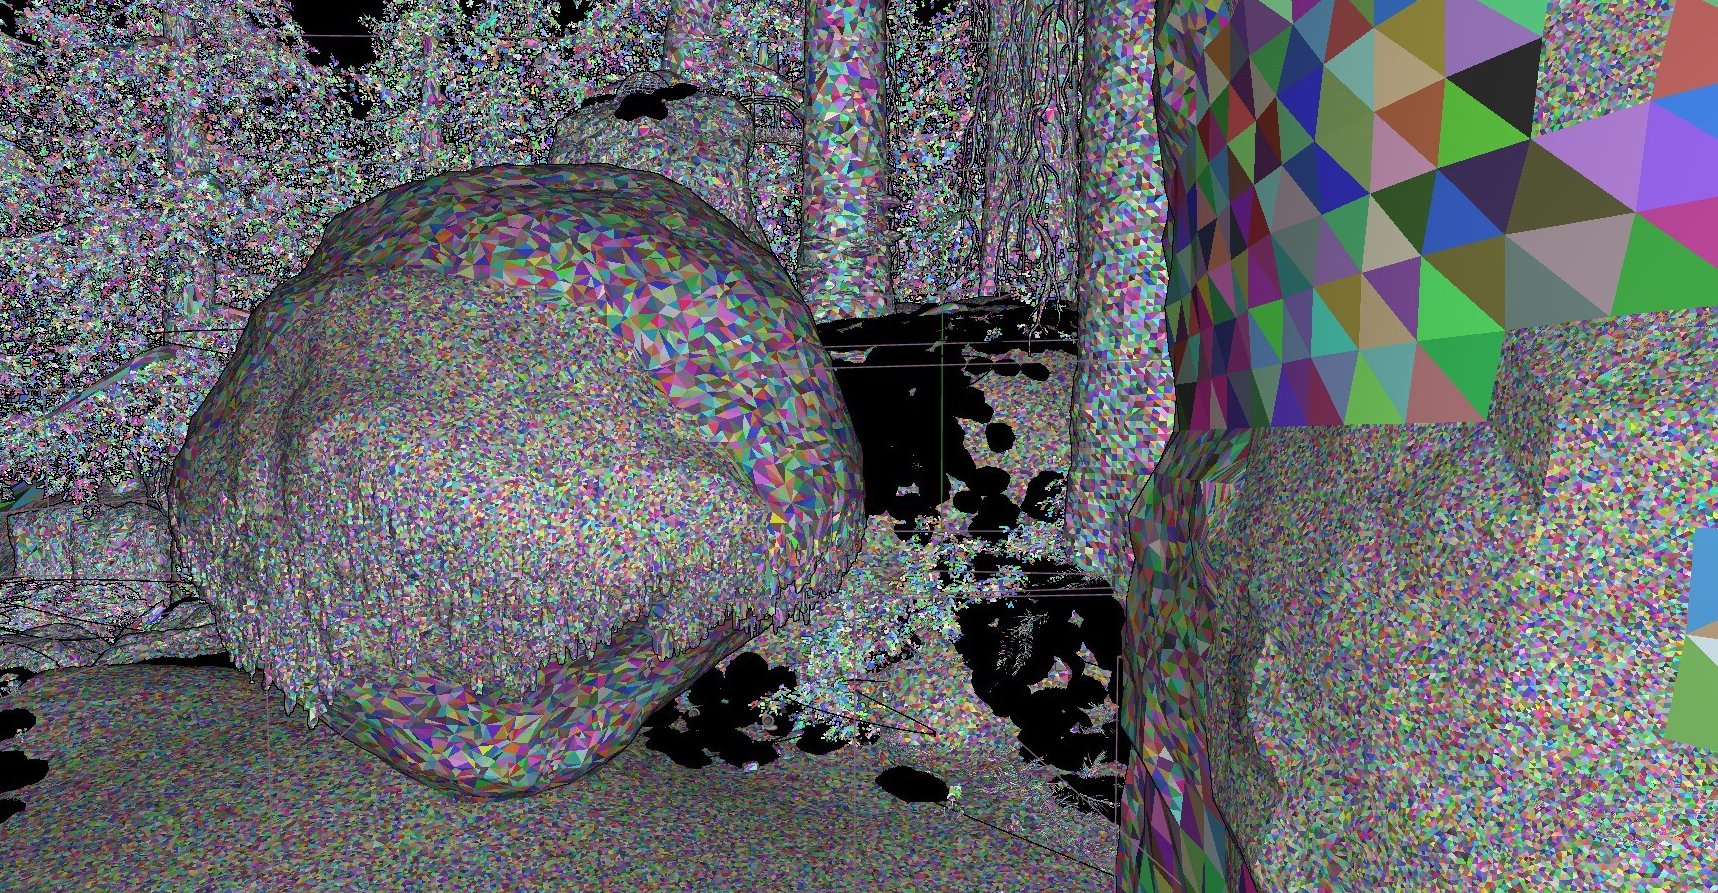
On High Material Quality Setting, Nanite Displacement is active on selected materials.
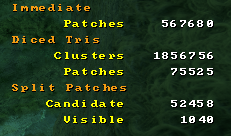
Cluster amount with High Material Quality Setting.
As you can see, the cluster amount difference is massive between the settings.
When you use displacement on Nanite materials, it’s very important that you set the material settings: Displacement Fade Start Size and Displacement Fade End Size. These settings disable runtime displacement at a specified distance, letting the mesh fall back to the pre-built cluster LOD structure, which is significantly cheaper to render. Set the fade distance as close to the camera as you can tolerate.
Showing the displacement fade range. Observe the change in density of clusters when the mesh changes mode from runtime displacement to the pre-built clusters.
With these changes we managed to reduce clusters by 70%. This ends up at 125k clusters in one of our default forest scenes.
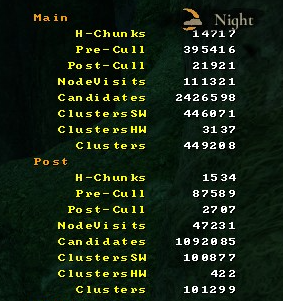
Cluster amount was as high as 450k before the changes.
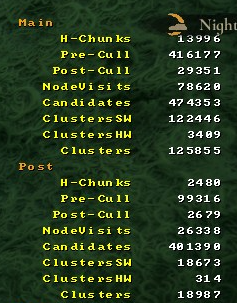
After the changes it went down to 125k.
Happy with the result, I wanted to move on to the ground layer covered with moss.
Removing Nanite Rendering On Ground Foliage
As shown earlier, one of the biggest culprits of cluster amount and overdraw was the ground moss. In any other game with a human perspective this usually isn’t a problem, but if you’re as tiny as a small mouse, as in our game, this quickly becomes a problem. The moss patches are suddenly covering the entire sightline. Since they’re so close to the camera, they need to be high detail, and on top of that they’re rendering on top of each other, creating overdraw.
After trying different things, I figured: why bother with Nanite rendering on these actors at all? We simply turned off Nanite rendering on these assets and created LODs for them.
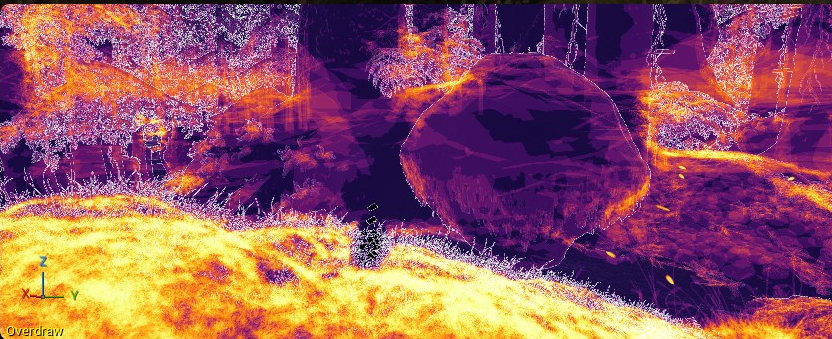
Overdraw on ground before changing the assets to regular meshes.
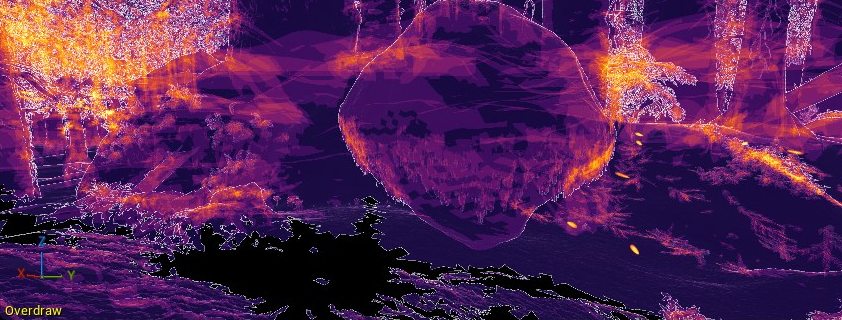
Notice that the overdraw is almost completely gone after the change.
The cluster count went from 165k to 32k, and almost all overdraw on the ground level disappeared, releasing 0.4ms from the Nanite visible buffer. But the gain in overall GPU frame time was nowhere to be seen, since the cost simply moved elsewhere: the prepass DDM_AllOpaqueNoVelocity grew by roughly the same amount the Nanite base pass had lost.
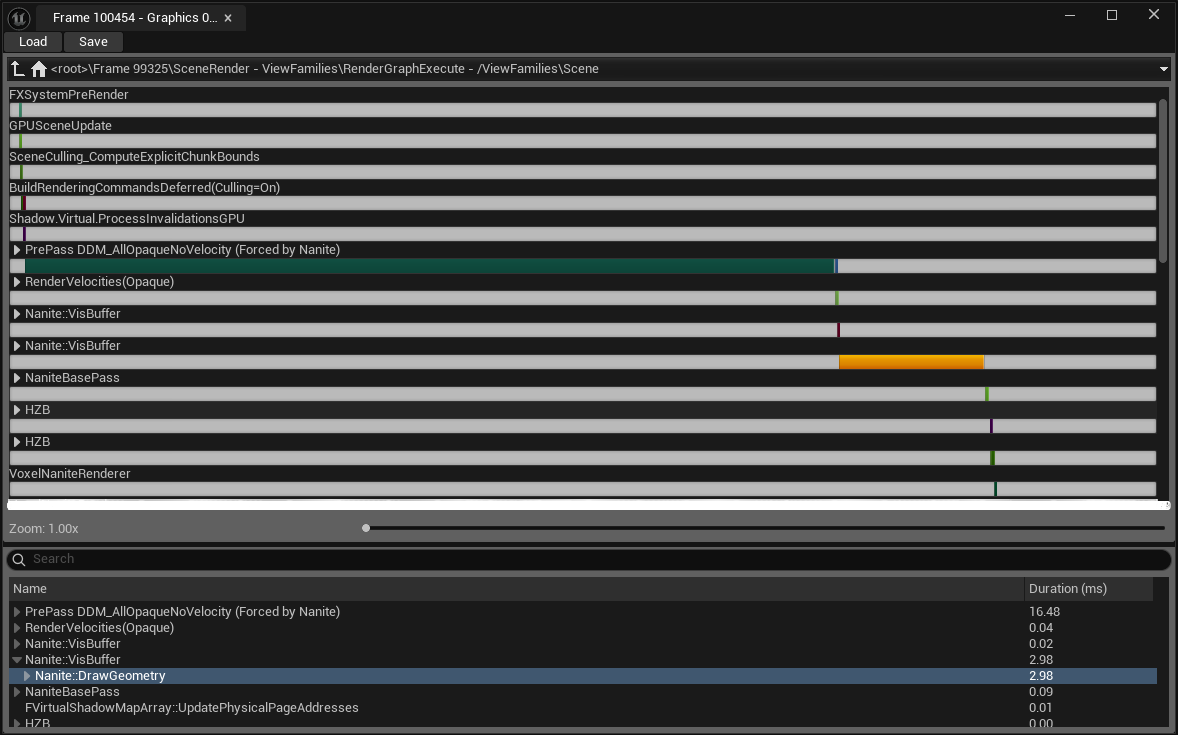
ProfileGPU stats showing that the prepass DDM_AllOpaqueNoVelocity now takes ~16 ms.
A prepass is a depth-only pass that runs before the main shading pass, rendering just the depth of opaque geometry into the depth buffer first. This lets the GPU early-reject any pixel that will end up hidden behind something closer, so the expensive base pass never has to shade it. DDM_AllOpaqueNoVelocity contains almost every actor except those with materials that also output motion vectors, which are handled elsewhere.
Thankfully, this large cost disappeared once we reduced the moss’s triangle count down to something reasonable for a non-Nanite mesh. As a bonus, this also let us switch to masked materials: making LOD 0 masked lets it fade out smoothly as the camera clips into it, and making the last LOD in the chain masked lets it fade out at max draw distance instead of popping away abruptly. On top of that, we also removed the vertex interaction function on the higher LODs to further optimize it.
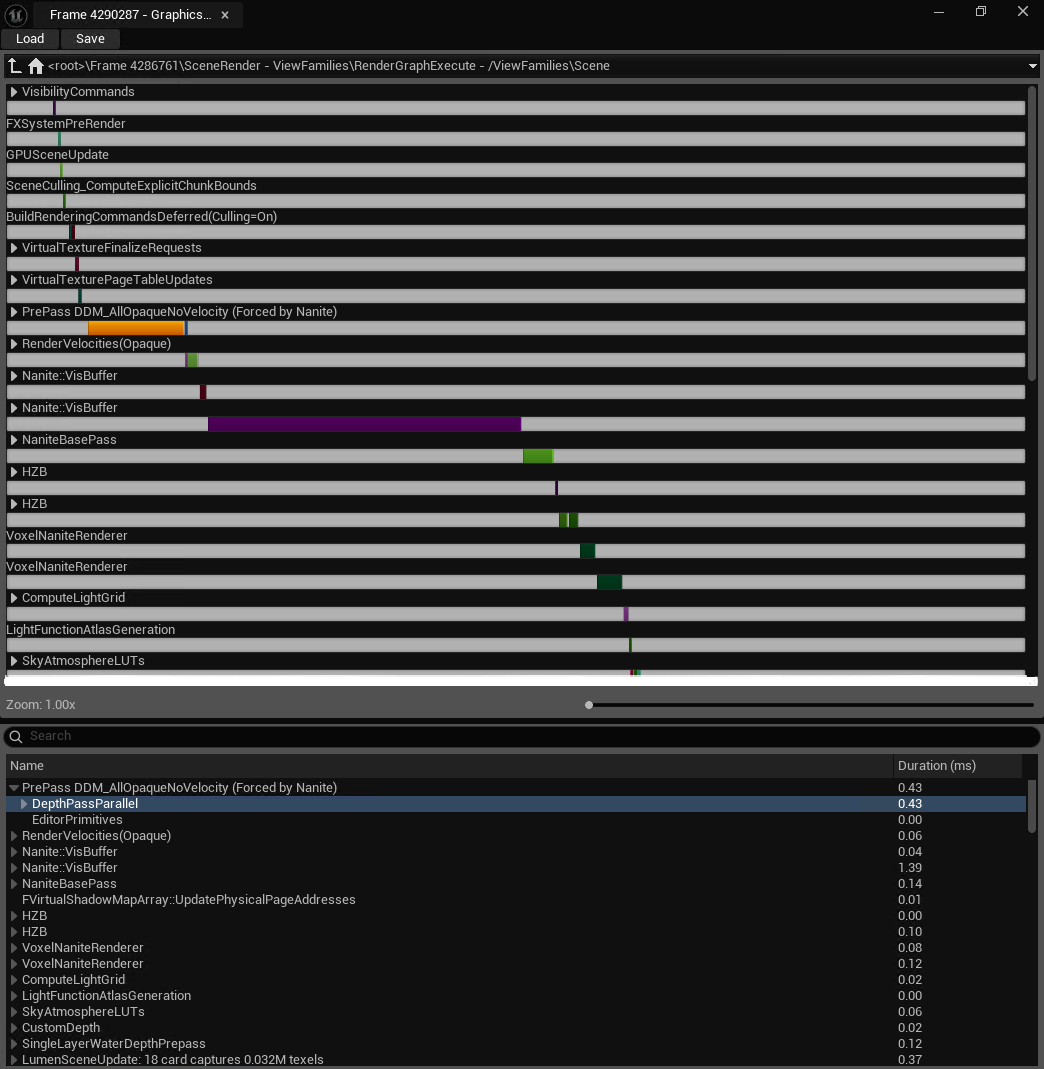
After the moss optimization we got the prepass down to 0.43 ms.
And finally the cost was reduced to something that we could live with.
The treeline was still an issue: a lot of overdraw and clusters in the canopy. But thankfully UE 5.7 came and made that issue easy to fix.
Voxelization In UE 5.7
This late into a project, upgrading engine versions is usually a risk you avoid. But the ability to voxelize our trees was too tempting to pass up, and the switch paid off.
In short, voxelization swaps distant Nanite clusters for voxels, preserving silhouettes while cutting overdraw. For the full breakdown, see Epic’s foliage documentation.
Activating voxel LODs on the trees reduced canopy overdraw massively.
Reminder of how much canopy overdraw we got before voxelization.
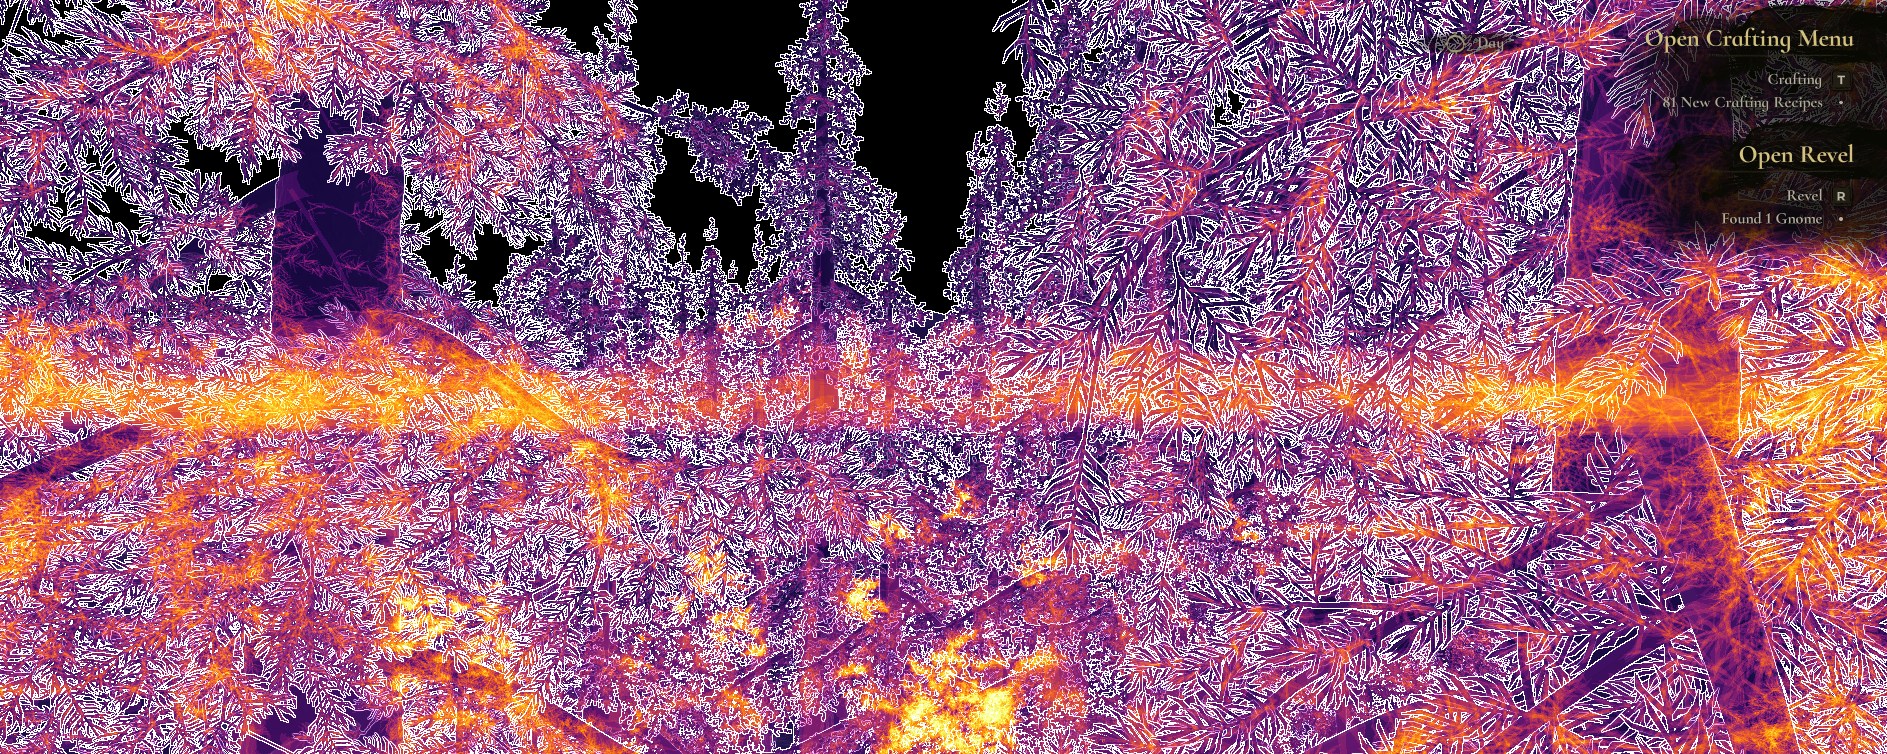
The Nanite overdraw debug visualization view looks much more purple than before voxelization.
Result
Cluster count down from ~425k to roughly 28k, and the Nanite visible buffer finally sitting comfortably under budget.
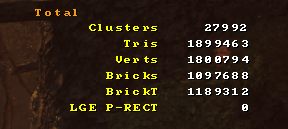
Final Nanite stats for the scene.
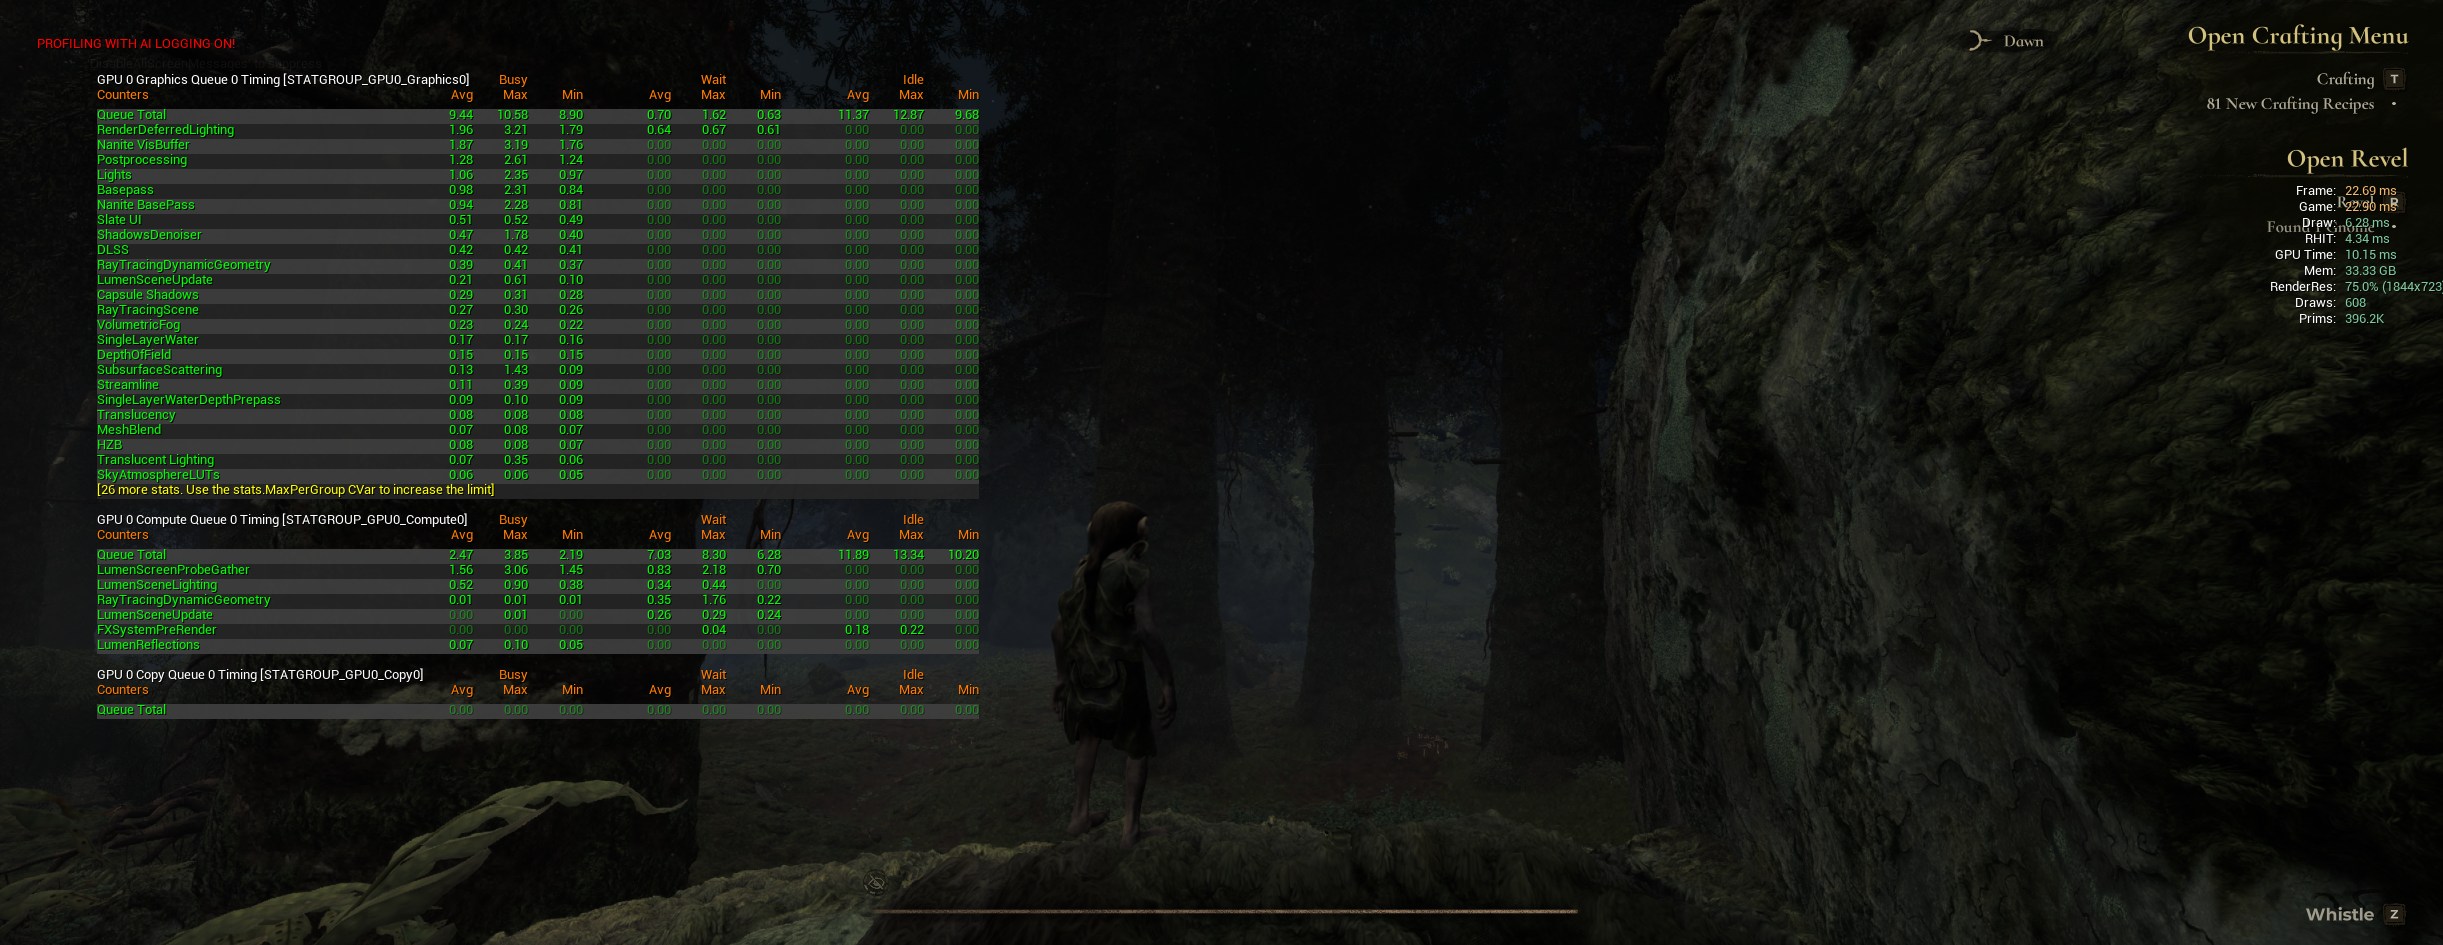
GPU stats after every fix, including voxelization.
Nanite VisBuffer down to ~1.9 ms average, total GPU frame time around 10 ms. The scene that once couldn’t even stay under the Nanite visible cluster buffer limit now renders comfortably.
Ending Notes
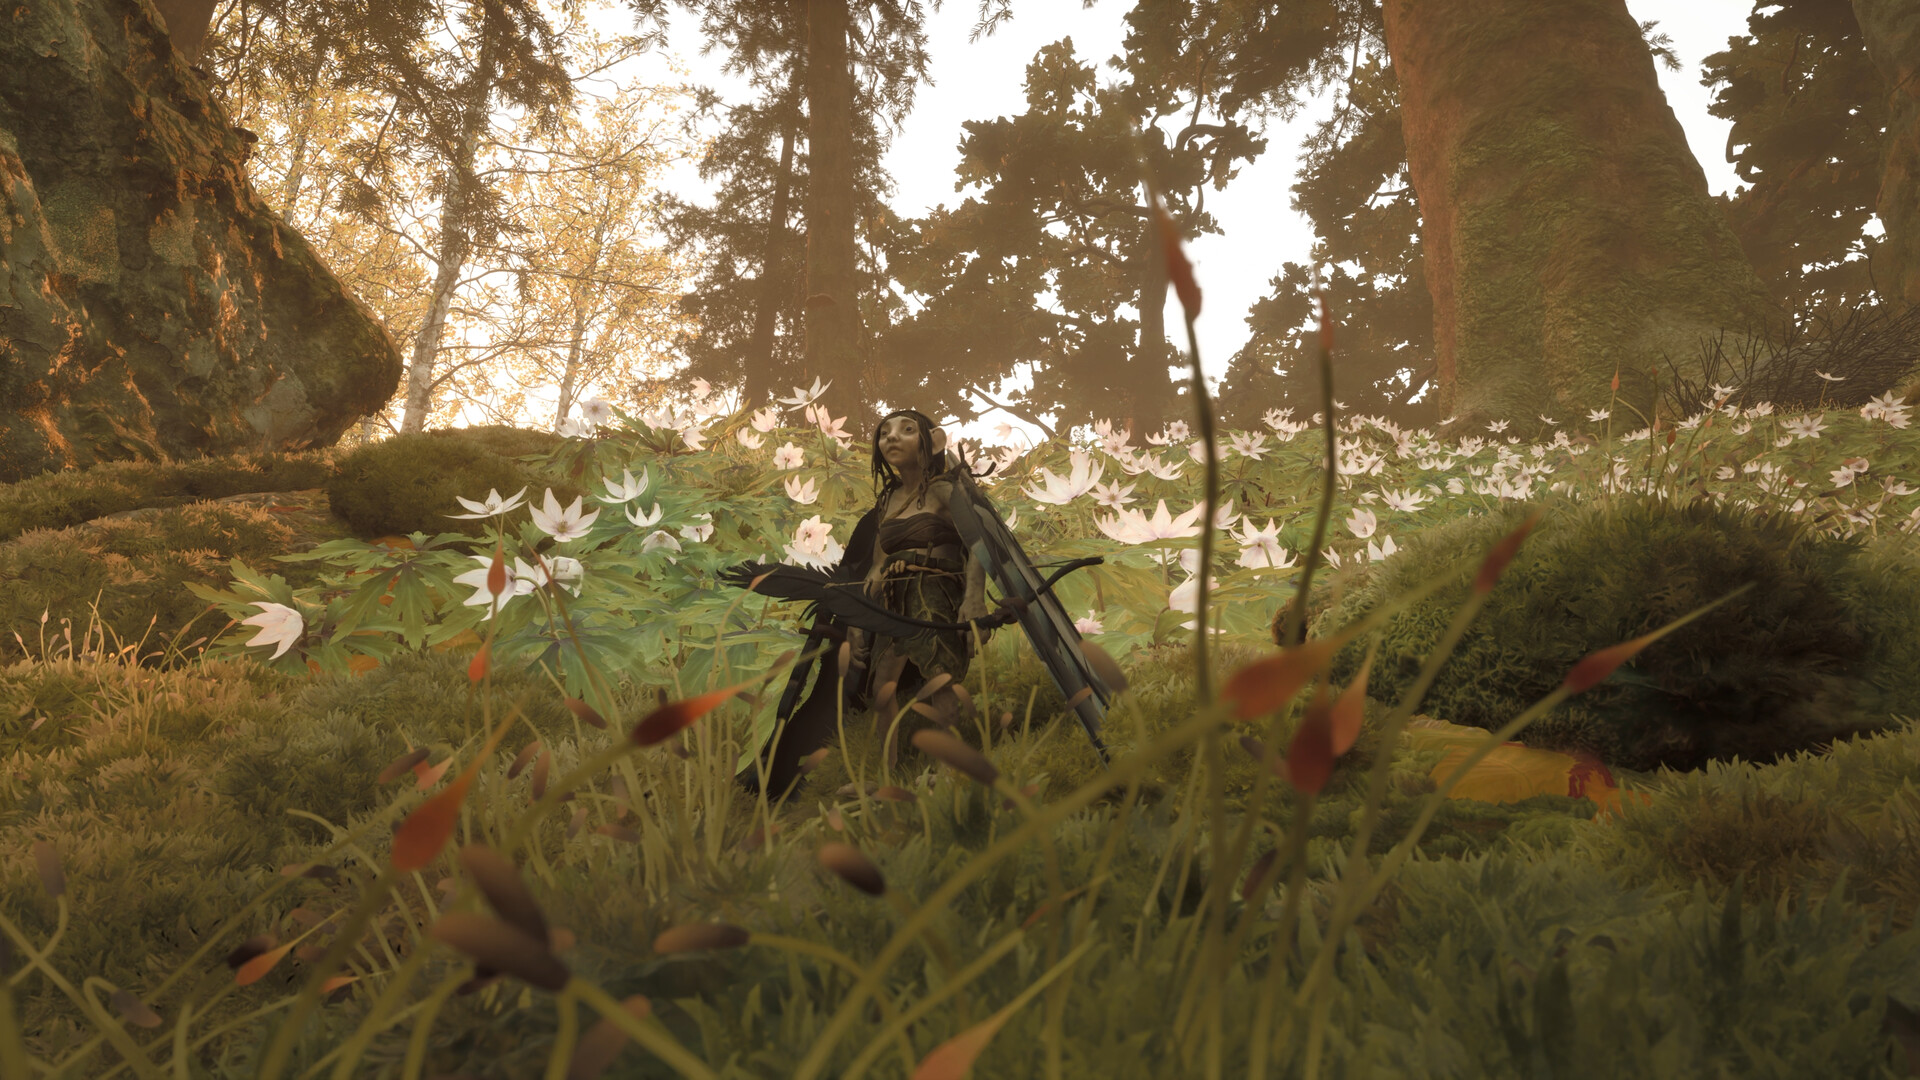
Screenshot from our title Trollheim: Gnomes.
Getting the Nanite visible buffer under control was never one single fix. It was a long list of small ones: mesh optimizations, edge length tuning, material quality tweaks, getting rid of overdraw, and finally using voxelization.
Thanks to the whole team for grinding through this with me, especially for the patience and the willingness to change and try things on the fly.
I hope this post was interesting and maybe gave you a few ideas on how to keep your own Nanite- and instance-heavy scenes under control.